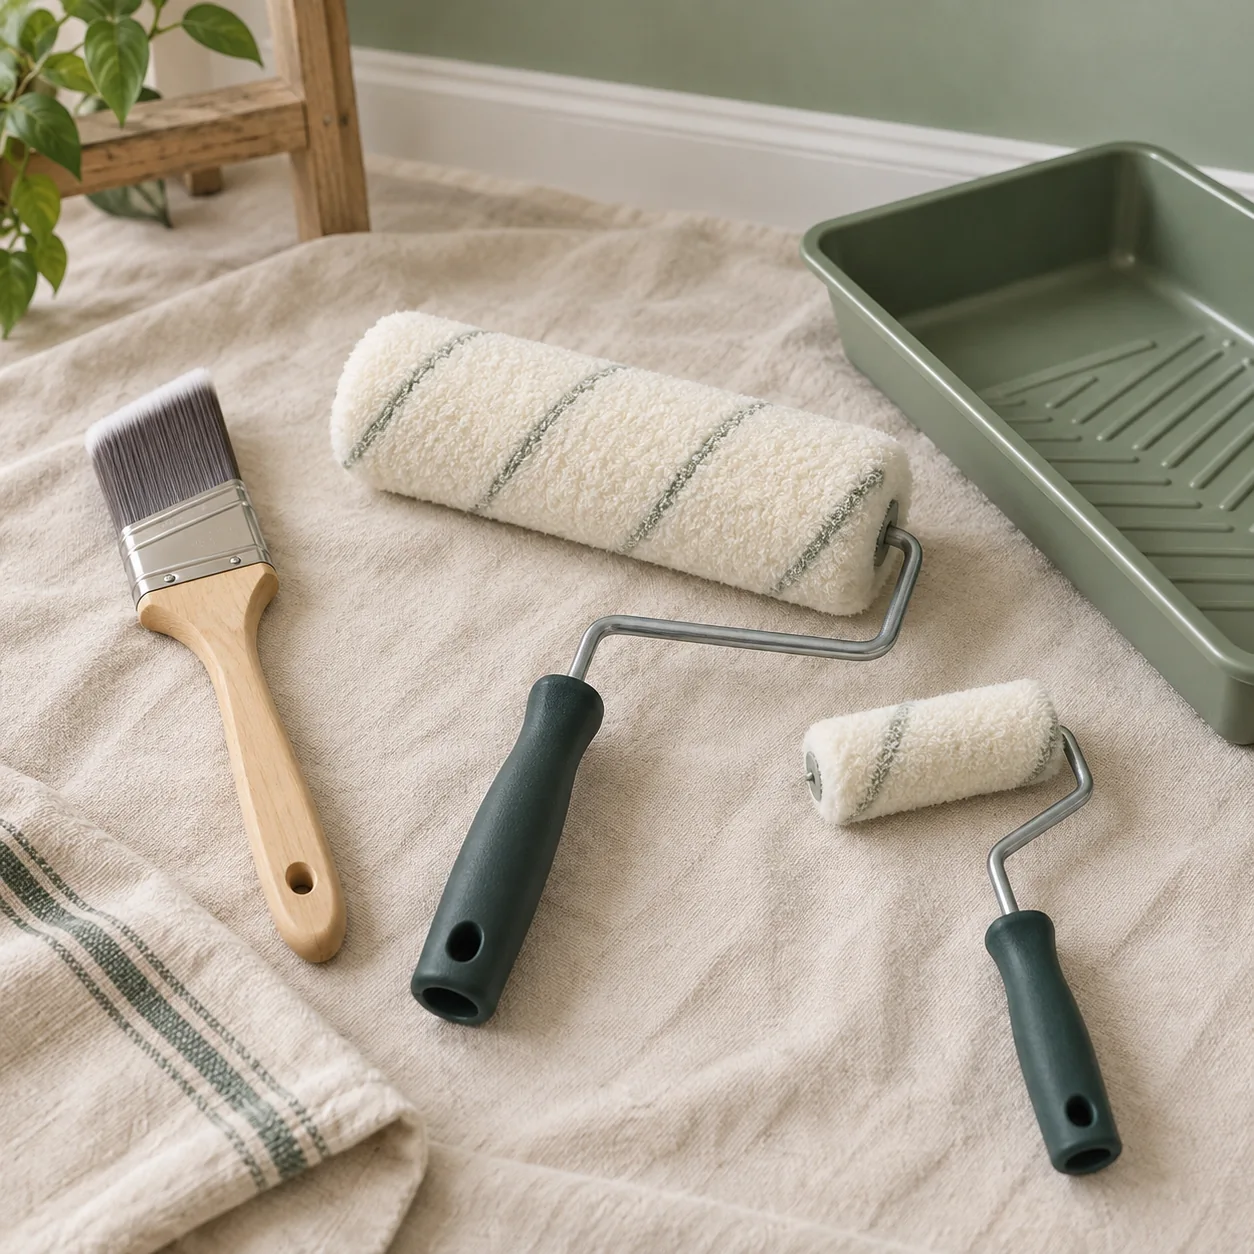
Standing in the paint aisle, it is easy to buy three tools that do the same job and miss the one that reaches a corner. Start with the surfaces in your project. The useful comparison is where each applicator fits, which coating it accepts, and what texture it leaves.
Use a brush for controlled edges and detail, a roller for broad surfaces, and a mini roller for narrow sections. Most room-painting jobs need both a brush and a roller.
Compare the toolsBefore you begin
This comparison covers tool selection for prepared surfaces. Check the coating’s instructions for preparation, ventilation, protection, application and cleanup before painting.
What you’ll need
- A list or photo of the surfaces you plan to paint
- The coating label and its applicator recommendations
- A brush, roller cover and compatible frame as selected below
- A suitably sized paint tray and floor protection
Tools & supplies for this project
Affiliate disclosure: We may earn a commission when you buy through these Lowe’s links. How our links work.
Use what you already own. If you need supplies, compare these options with the requirements above and choose only the items your project needs.
Check Lowe’s for current price, availability and specifications.
Make an informed choice
Choose the tools for your job
- 01
Separate edges from broad areas
Walk through the job and mark three groups: edges, open surfaces, and small recesses. A brush gives control at corners and trim. A roller covers a broad, flat area faster. Around a window, you may need a brush at the boundary and a roller on the surrounding wall.
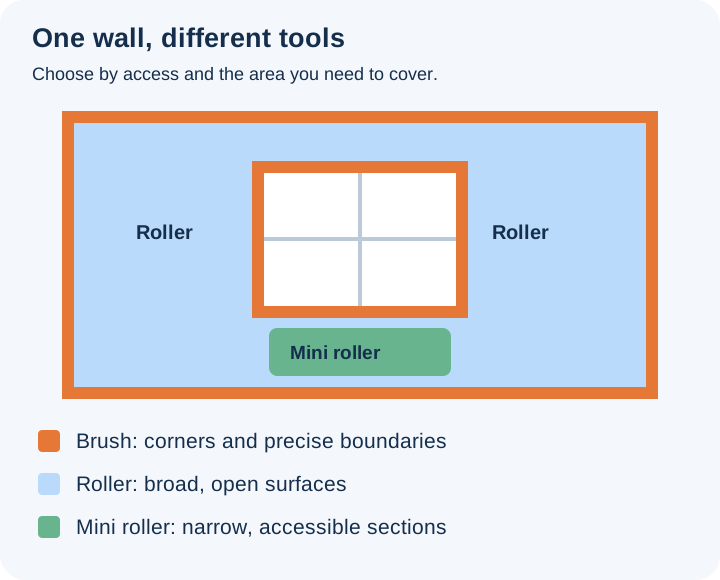
Use the shape of the job to choose the tool; this diagram shows access, not a prescribed painting order.Open full-size image - 02
Choose a brush for the boundary work
An angled brush helps guide paint along an edge. Pick a width you can control within the available space; a wide brush can be awkward on narrow molding. For latex paint, look for a compatible synthetic-bristle brush. Check the package against the actual coating instead of selecting by handle shape or price alone.
- 03
Match the roller cover to the surface
Nap means the length of the cover’s fibers. A shorter nap generally suits a smooth finish; a longer nap reaches into textured surfaces. More paint capacity is not automatically better: a high nap can leave unwanted texture on a smooth wall. Follow the coating and cover recommendations together.
- 04
Use a mini roller where a full-size one will not fit
A small roller is useful for narrow wall strips and small flat sections. It still needs clearance for the frame. Check the space before buying: if the roller cannot move without touching the neighboring surface, a brush may offer better control. Match the mini cover’s fabric and finish to the rest of the job.
- 05
Check the complete set before checkout
A roller cover is only the replaceable sleeve. Confirm that the frame accepts its length and fitting, and that the tray accommodates the loaded roller. If you need an extension pole, check its connection too. Lay the planned set out on your shopping list so a cover does not get mistaken for a complete tool.
- 06
Try the combination before painting the whole room
Use a prepared test area to see how the coating and applicator behave together. Load the roller evenly and remove excess on the tray’s ridges. Keep pressure light and even. Check the transition between brushwork and rolled paint before repeating the same technique across the room.
Optional supplies on Amazon
Affiliate disclosure: As an Amazon Associate I earn from qualifying purchases. How our links work.
Use what you already have. These links open Amazon search results so you can compare suitable supplies; they are not individual product reviews.
Why not just use a thicker roller cover?
A thicker cover holds more paint and can reach deeper texture. That is useful on a rough surface, but it can also leave a more pronounced pattern on a smooth one. Choose for the finish you want, then work at a pace that keeps the coating even.
Build the smallest useful kit
For a small bedroom, write down the wall area, corners and narrow sections first. Cross out tools you already own that still suit the coating. Add only the missing pieces. A spare sleeve may be useful; three different frame sizes are not automatically necessary.
Choose by the part of the job
| Area | Start with | What to check |
|---|---|---|
| Corners and precise boundaries | Angled brush | Bristles suit the coating; width is controllable |
| Broad, open wall | Full-size roller | Cover fabric and nap suit the surface |
| Narrow flat strip | Mini roller | Frame fits without touching adjacent surfaces |
| One room with trim and walls | Brush plus roller | The two tools leave a compatible finish |
A quick final check
- Each surface has a suitable applicator.
- Brush bristles and roller fabric match the coating.
- The frame, cover, tray and any pole fit together.
- A small test confirms the finish before the whole job.
Common questions & sticking points
Do I need both tools to repaint a room?
Usually, the broad walls and precise boundaries call for different tools. A brush-and-roller pair is more versatile than trying to make one applicator reach every part of the room.
Does a roller kit always include the right cover?
No. Read the contents and specifications. A kit can contain a usable frame while its supplied sleeve is the wrong nap or fabric for your chosen coating and surface.
Sources & further reading Optional
References used to check this guide. Follow your product’s own safety instructions where its design differs.
- Sherwin-Williams: choosing brushes and rollers
- Wooster: roller nap and surface texture
- Sherwin-Williams: application techniques
- Purdy: the parts of a roller system