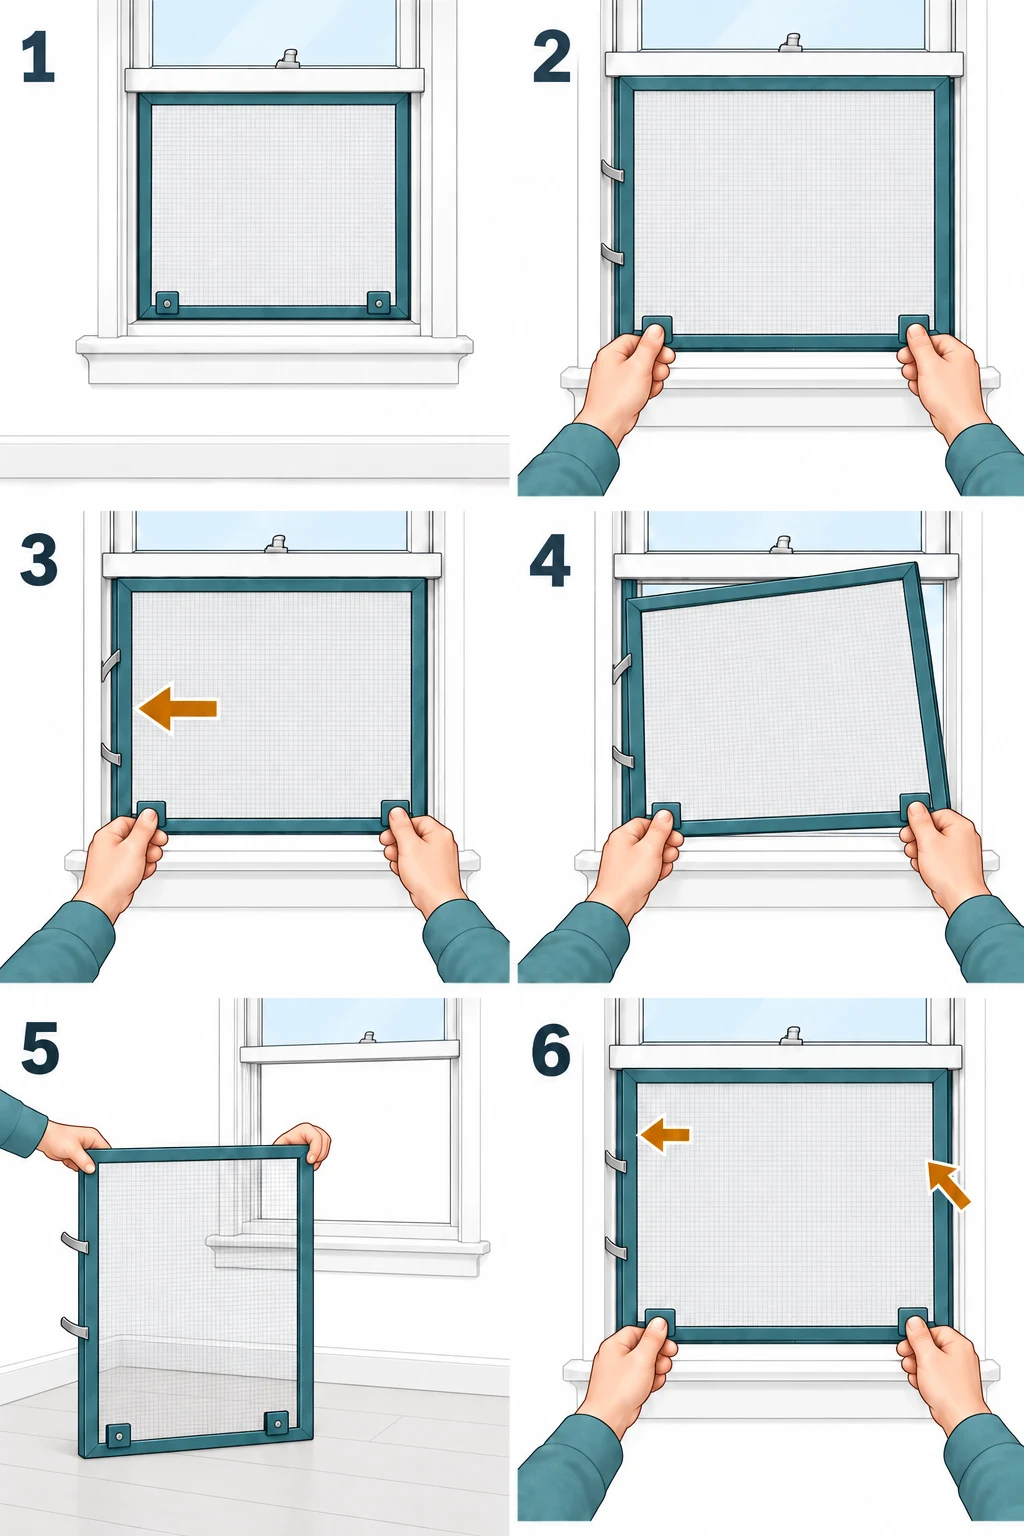
The screen is the lightweight mesh panel; the sash is the heavier frame holding glass. Identify which one you are handling first. This illustrated example is a side-loaded screen with compression springs, not a retractable screen or one secured with screws.
Support the screen frame, compress its spring side, release the opposite edge from its channel, and bring the frame safely indoors.
Go straight to the stepsBefore you begin
Work from a secure position inside at ground level. Keep children and pets away from the opening. Screens cannot prevent a fall. Stop if the hardware does not match the side-spring example.
What you’ll need
- The window’s model-specific instructions
- Gloves and eye protection
- Clear indoor floor space
- A helper for a large screen
Tools & supplies for this project
Affiliate disclosure: We may earn a commission when you buy through these Lowe’s links. How our links work.
Use what you already own. If you need supplies, compare these options with the requirements above and choose only the items your project needs.
Check Lowe’s for current price, availability and specifications.
Let’s do this
Step by step
- 01
Expose the screen
Open the appropriate sash using the window instructions. Identify the spring-loaded side and the opposite retaining channel before moving anything.
Open full-size image - 02
Hold the frame
Grip the intended tabs and support the rigid frame with your other hand. Never pull on the mesh or its retaining spline.
Open full-size image - 03
Compress the spring side
Gently move the frame toward the side containing the springs. This creates clearance at the opposite edge. Do not pry the frame with a screwdriver.
Open full-size image - 04
Release the opposite edge
With the springs compressed, ease the free edge out of its channel toward the removal direction specified for your window. Keep supporting the frame.
Open full-size image - 05
Bring it indoors
Turn the released frame only as much as needed to clear the opening. Set it on a flat, protected surface. Do not reach or lean outside to rescue a slipping screen.
Open full-size image - 06
Refit and check
Seat the spring edge first, compress it, and place the opposite edge back in its channel. Release gently. Confirm the frame is fully seated before closing the window.
Open full-size image
What if the springs are at the top?
The same drawing is not an instruction to push every screen sideways. Some Milgard screens use upward pressure to compress the top springs; others use clips or plungers. Match the direction and hardware to the manufacturer’s procedure.
A frame that will not move
Check for another retaining clip or painted-in edge. A seized frame is not solved by pulling harder on a brittle tab. Photograph its corners and identify the model before continuing; this also helps you obtain the correct replacement if a tab is already broken.
A quick final check
- The screen type matched the instructions.
- The mesh and frame remain intact.
- All retaining edges are seated after replacement.
Common questions & sticking points
Do I need to remove the glass?
Usually not for a removable screen. Do not release sash balances just to remove mesh.
Can I leave the screen out?
Close and secure the window when finished. An open window needs fall precautions whether a screen is present or absent.
Sources & further reading Optional
References used to check this guide. Follow your product’s own safety instructions where its design differs.
- Ply Gem: Side-loaded compression-spring screen seating
- Milgard: Top-compression screen removal variant
- Pella: Screen types and fall warnings