If your goal is to reach the outside of the glass, you may not need to take the sash out. This guide shows a lower double-hung sash with two inward-sliding tilt latches. A sash is the frame around the glass, not the mesh insect screen.
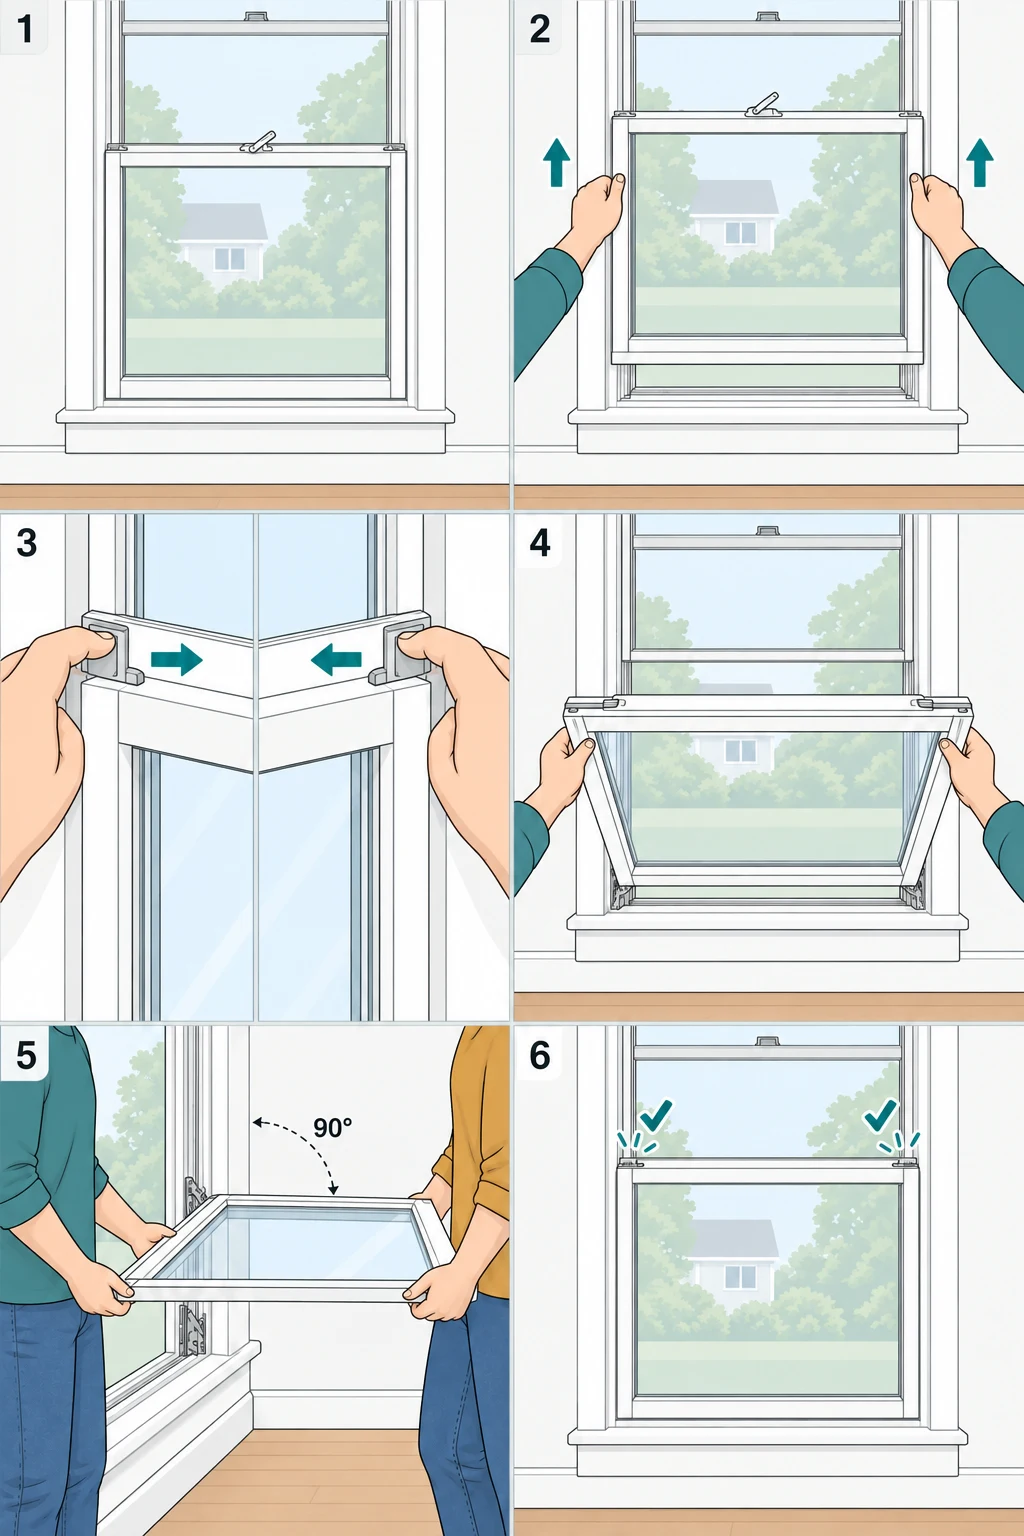
Unlock and raise the lower sash, release both tilt latches, support it as it tilts indoors, then return it upright and fully engage the latches.
Go straight to the stepsBefore you begin
Only use this method on a window designed to tilt this way. Stay inside; never put body weight on the sash. Glass is heavy. Do not release balances, pivot shoes, or retention clips as part of this cleaning procedure.
What you’ll need
- Window model and owner’s manual
- A helper who can support the sash
- Clear indoor working space
- Glass-cleaning supplies approved for the window
Tools & supplies for this project
Affiliate disclosure: We may earn a commission when you buy through these Lowe’s links. How our links work.
Use what you already own. If you need supplies, compare these options with the requirements above and choose only the items your project needs.
Check Lowe’s for current price, availability and specifications.
Let’s do this
Step by step
- 01
Identify and unlock
Confirm the window uses the pictured pair of tilt latches. Clear the area and unlock the lower sash. Have your helper ready before releasing it.
Open full-size image - 02
Raise the sash
Raise it to the manufacturer’s specified starting height. Pella’s illustrated release-latch models use about 3 inches; other models differ.
Open full-size image - 03
Release both latches
Support the sash and slide both top-corner releases inward. If one side stays caught, stop rather than twisting the frame.
Open full-size image - 04
Tilt toward the room
Bring the top toward you slowly. Keep both bottom pivots engaged. Support both sides as the sash approaches the cleaning position.
Open full-size image - 05
Support while cleaning
Keep the horizontal sash supported by a helper as specified by the maker. Clean reachable glass from indoors. Do not lift one corner out of its balance shoe.
Keep the sash connected and supported. This is tilting for cleaning, not complete removal.Open full-size image - 06
Return and secure
Retract the latches as directed while lifting the sash upright. Let both engage fully in their channels. Check engagement, then lower and lock the sash.
Open full-size image
Optional supplies on Amazon
Affiliate disclosure: As an Amazon Associate I earn from qualifying purchases. How our links work.
Use what you already have. These links open Amazon search results so you can compare suitable supplies; they are not individual product reviews.
What about removing the sash completely?
Removal is model-specific. Andersen’s A-Series procedure, for example, distinguishes retained and unretained pivot connections. A release sequence for one window can leave another sash unsupported. Identify the exact series and manufacture date before attempting removal; arrange a qualified window technician if you cannot match the hardware.
A useful stopping point
Tilting is enough for many cleaning jobs. Photograph a damaged latch and the identification label while the window is safely closed; that is useful information for a parts supplier without disturbing spring-loaded components.
A quick final check
- Both bottom pivots stayed engaged.
- The sash was supported throughout.
- Both tilt latches re-engaged before normal use.
Common questions & sticking points
My window has no tilt tabs. Should I pry it?
No. It may use a different release mechanism or may not tilt. Follow that model’s manual.
Is this a universal sash-removal guide?
No. The pictured steps keep the sash connected to its balances. Complete removal requires separate, model-specific instructions.
Sources & further reading Optional
References used to check this guide. Follow your product’s own safety instructions where its design differs.
- Pella: Tilt-latch cleaning procedures, pages 27–28
- Andersen: Example of model-specific pivot and retainer differences